How to use Gravity Payments
An incredible feature we have is the ability to accept payments over text.
Here is a brief introduction on how this feature is used.
1. First, to send the invoice to the customer to be paid, on the ATMe dashboard under the specific customer to be billed, click the "+text" button.

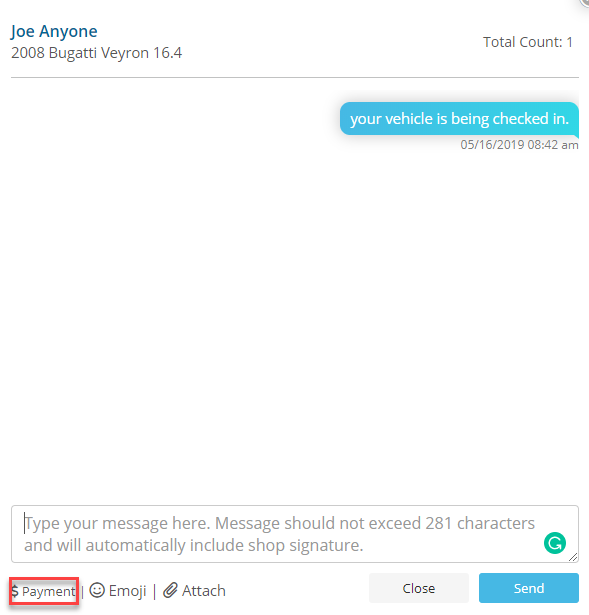
2. This will bring up the chat menu. In the bottom left hand corner you will find a "$ Payment" button. Click this to bring up the sub-menu.
3. In the sub-menu you will find the text field labeled as such;
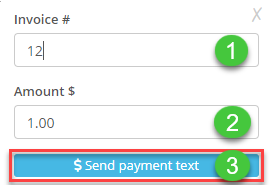
(1 )" Invoice #"- If you have an R.O. assigned to this customer, it will auto-populate that information. However, if the invoice number and the R.O. number differ, this field is editable and you can fill out the proper invoice # for that R.O.
(2 ) "Amount $"- This would be where to input the amount to be charged to the customer, based on the invoice.
(3 ) "$ Send payment text"- Once you have completed filling out the previous fields and checked to ensure accuracy, click this button to send out the invoice.
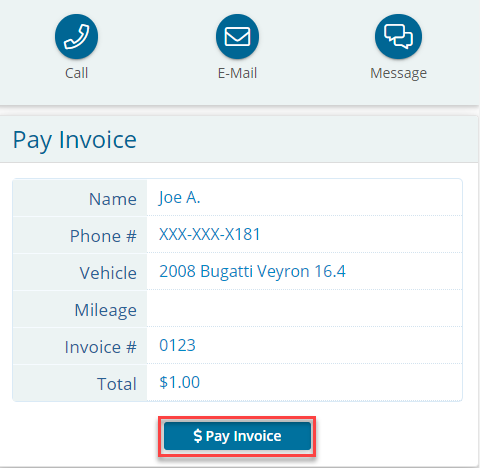
4. On the customers end, they will receive a link to pay the invoice which will take them to this site giving them the information on the invoice but also including links to call, email, or message about any concerns they may have. They will click the "$ Pay Invoice" button.
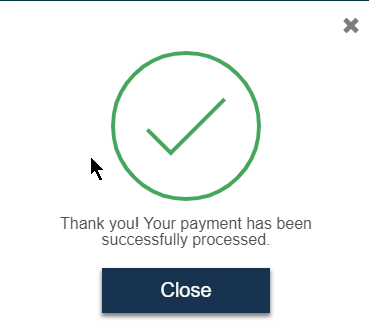
5. After clicking that button, it will bring up a secured module where they will fill out their card information. Once properly filled out, they will click the big blue "Pay [amount]" button and after processing the payment, (hopefully) they will receive the follow up message.
6. As soon as they have completed this process, in your ATMe Dashboard you will receive the notification that this invoice has been paid.
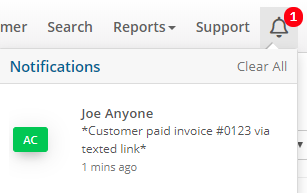
7. Clicking on this notification will bring up the text box with the confirmation and a follow up text letting the customer know that you have received their payment for that invoice!

8. You will find a copy of the invoice in your business email, or the email you have set up under "company setup"
Here is a brief introduction on how this feature is used.
1. First, to send the invoice to the customer to be paid, on the ATMe dashboard under the specific customer to be billed, click the "+text" button.
2. This will bring up the chat menu. In the bottom left hand corner you will find a "$ Payment" button. Click this to bring up the sub-menu.
3. In the sub-menu you will find the text field labeled as such;
(1 )" Invoice #"- If you have an R.O. assigned to this customer, it will auto-populate that information. However, if the invoice number and the R.O. number differ, this field is editable and you can fill out the proper invoice # for that R.O.
(2 ) "Amount $"- This would be where to input the amount to be charged to the customer, based on the invoice.
(3 ) "$ Send payment text"- Once you have completed filling out the previous fields and checked to ensure accuracy, click this button to send out the invoice.
4. On the customers end, they will receive a link to pay the invoice which will take them to this site giving them the information on the invoice but also including links to call, email, or message about any concerns they may have. They will click the "$ Pay Invoice" button.
5. After clicking that button, it will bring up a secured module where they will fill out their card information. Once properly filled out, they will click the big blue "Pay [amount]" button and after processing the payment, (hopefully) they will receive the follow up message.
6. As soon as they have completed this process, in your ATMe Dashboard you will receive the notification that this invoice has been paid.
7. Clicking on this notification will bring up the text box with the confirmation and a follow up text letting the customer know that you have received their payment for that invoice!
8. You will find a copy of the invoice in your business email, or the email you have set up under "company setup"
Related Articles
Update billing information ONLY when there is a failed payment.
If you have this red banner on your Dashboard Please follow these steps. (If you just want to update your billing information but DO NOT have a failed payment, please contact support.) 1. Make sure you are logged in as Admin. 2. On the red banner, ...Web Widget Setup - Kiosk Scheduler & Text Widgets
If you do not currently have Kiosk added as part of your shop package, please contact our sales team to assist in adding the Kiosk and Widget functions. (469) 202-4090 information@autoflow.com All processes detailed below can also be found on the ...Using CTRL+ENTER for a line-break for better organization of text.
When entering notes into the DVI's "add notes" field, along with anywhere you may need the use to use another line, we have added the ability to use CTRL+ENTER to add in a line-break. This will help organize items for anyone modifying that field and ...Using Talk to Text to save time filling out a DVI
This article will help you start using talk-to-text on a DVI to help you fill them out faster. You can use Speech-to-Text on any note fields throughout the application that allow you to type. This feature is not a part of the application, it is ...Text Filtering FAQ
New protocols implemented by AT&T are expected to go into effect April 1st. Our team at autotext.me will be closely monitoring for any changes in deliverability from this date and determine more clearly what our businesses can expect moving forward. ...